

How to Sync Miro Cards to Tasks in Wrike With Automated 2-Way Updates
Keep an eye on every idea by sending the best Miro cards directly into a Wrike project automatically as an assignable task. This guide will show you how to do just that with Wrike Sync powered by Unito to achieve a simple, no-code 2-way integration with Miro. Although this demonstration focuses on Wrike, you can follow the same steps using any project management tool supported by Unito, including: Asana, Trello, monday.com, Favro, Teamwork, Zoho Projects, Jira and more. If you’re new to Unito, you can check out our Wrike Miro integration overview before coming back here to set up your self-serve, no-code, 2-way integration.
There are two ways to connect Wrike and Miro with Unito:
- Through Unito’s standalone platform: Log in here and create a flow between your tools directly from Unito.
- The Wrike Sync add-on: A version of Unito embedded directly in Wrike with similar features that enables you to sync tasks from the comfort of your Wrike workspace.
In either case, once you’re ready to create a flow between tasks and cards the instructions in this guide will show you how to:
- Turn Miro cards into Wrike tasks (or tasks for another project management tool) automatically
- Keep those cards and tasks in a real-time, two-way sync so that changes in one will appear in the other
Here’s what our Miro – Wrike sync looks like with Unito:
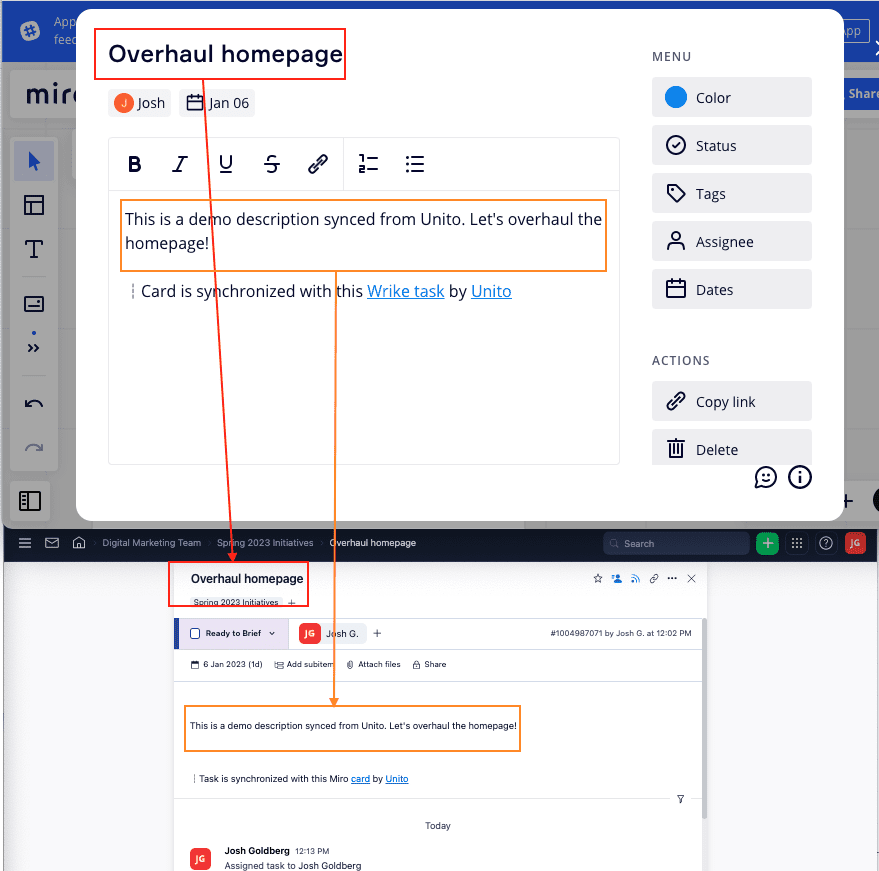
Bottom: How the card now appears as a Wrike task through Unito
In this article about using Unito’s Miro integration
- How to connect Miro and your other tool to Unito
- Confirm your flow direction from Miro
- Filter your Miro cards from syncing
- Pick fields to keep in sync
- What’s next after syncing Miro?
Watch our team sync Miro cards to Wrike
Before you sync Miro cards into Wrike
- If you need some inspiration for your Miro board, here’s a template we created for the Miroverse!
- Check out our integration overviews of Miro and Wrike to review their capabilities.
- If you need help connecting Wrike and Unito, here’s an article on how to add Wrike Sync by Unito to your workspace.
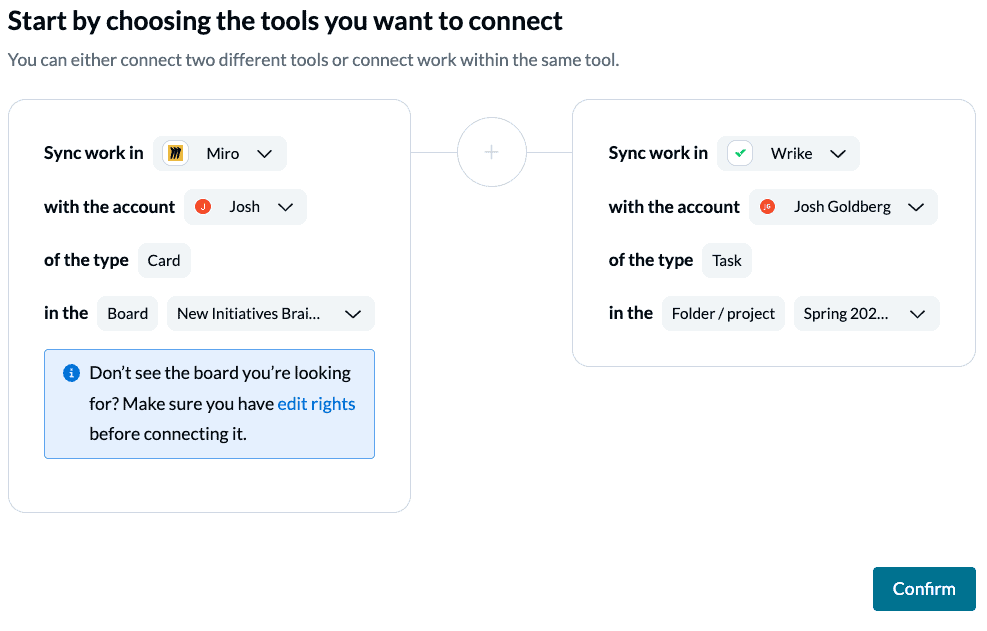
Step 1: Connect your Miro board and Wrike project to Unito
- Now you can either go to the Unito App and click +Create Flow or continue from your Wrike workspace once you’ve added Wrike Sync by Unito.
- Click Start Here to connect your tools.
- Select +Add a tool to this flow in either column and connect Wrike.
- Click +Choose account to specify the account you want to use.
- Pick your project and follow the on-screen instructions.
- Repeat steps 3 – 5 to connect your Miro board to Unito.
- Click Confirm.
Step 2: Confirm the flow direction Miro to Wrike
For this Miro integration, you can only select a one-way flow for now. That means Miro cards can automatically generate new Wrike tasks, but not the other way around. As you’ll see though, the details, or fields, of those cards and tasks will still update each other in a two-way sync.
This step is only to determine where new work items (cards or tasks) will be created automatically by Unito.

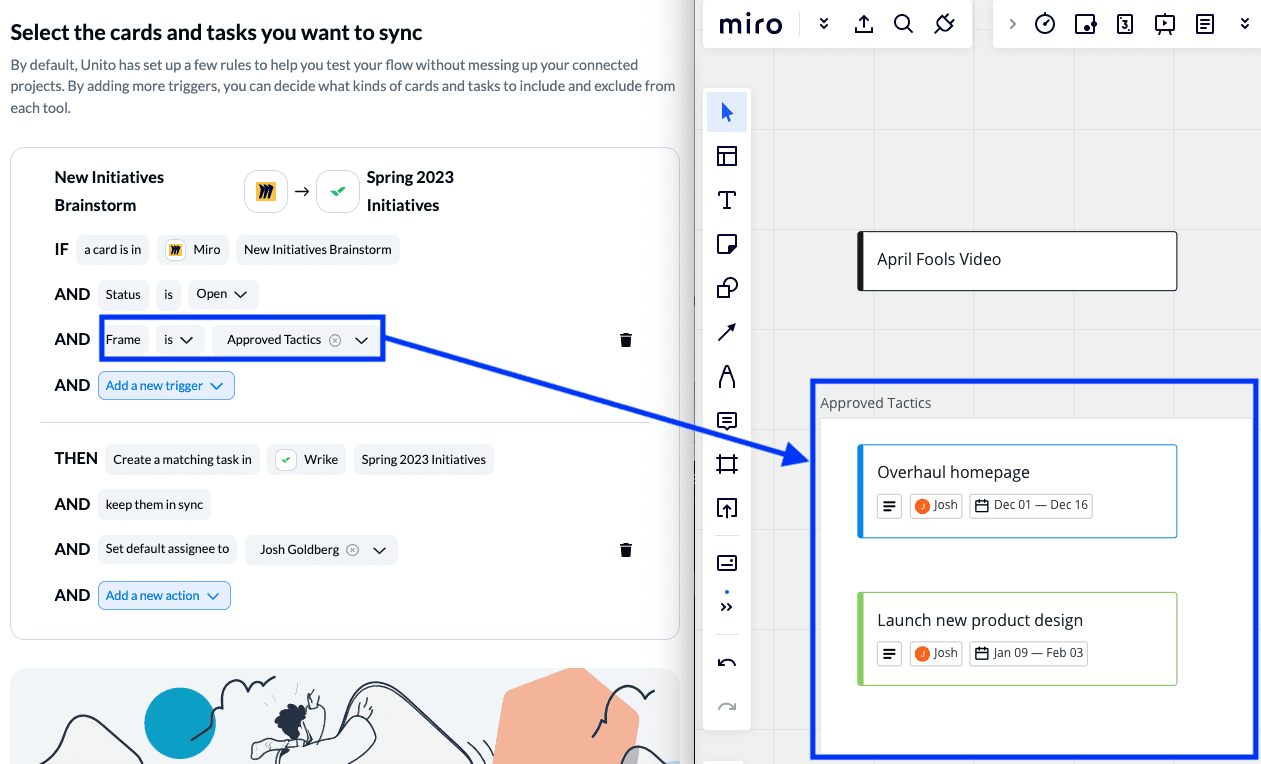
Step 3: Set simple rules to filter Miro cards
At this stage, you can select conditions to filter out Miro cards that you don’t want to appear as Wrike tasks. If you make no changes to the rules, then all Miro cards in your board will sync to Wrike.
Select Add a new trigger to begin setting up your rules. There can be some variability here, depending on your particular setup. The first thing you’ll have to do is decide which trigger should determine whether or not a card syncs to Wrike: assignee, card color, or frame:
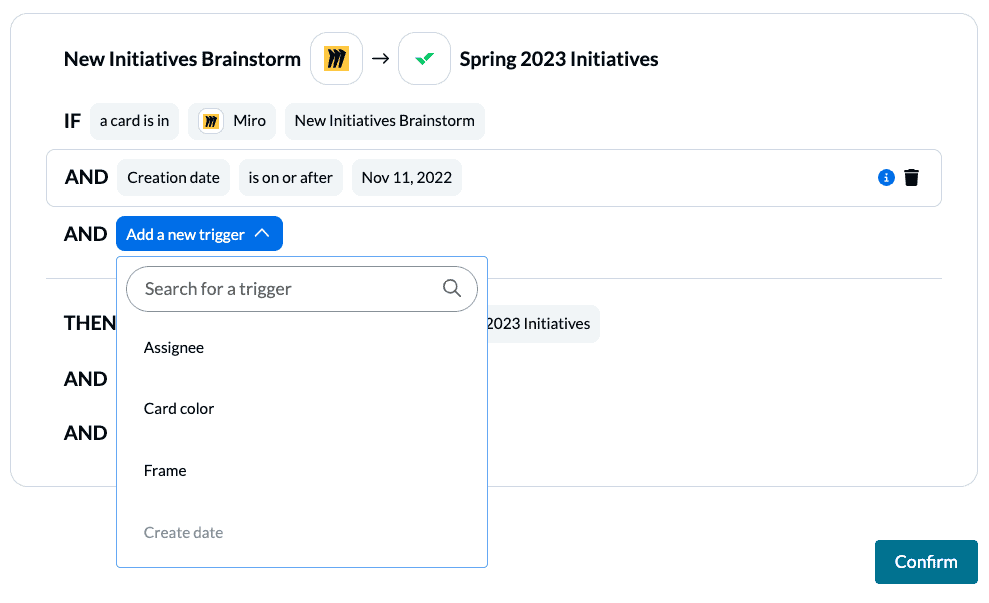
In our demo, we went with Frame, since that made it easy to visualize the cards we planned to sync over. Here’s what that looks like:
You can learn more about setting up rules here.
Step 4: Pick fields to keep synced
Fields represent the details of your Miro cards and Wrike tasks. At this stage you can decide how much or how little information to sync between the two.
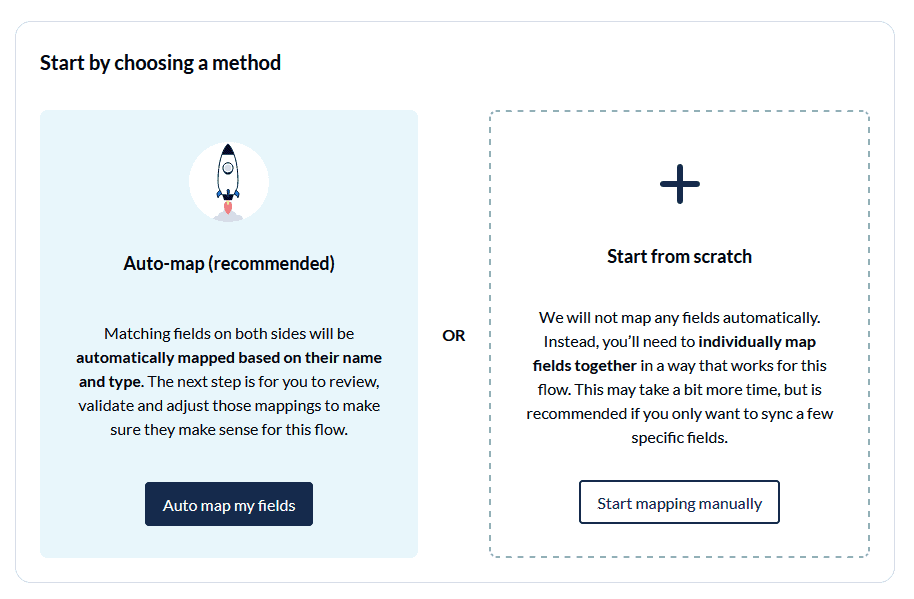
But first, you’ll be asked whether you want to set up your field mappings from scratch or let Unito do this automatically. You can choose the auto-mapping function and still edit the fields afterwards.
Most fields will be automatically mapped for two-way updates so that changes in Miro will appear in Wrike and vice versa, but you can also change that if you wish. Simply set any individual field to a one-way sync to prevent changes in the destination field from updating the source.
Example: If you set the description field to one-way from Wrike to Miro and someone edits the description in your Wrike task, you’ll see those changes appear on the synced Miro card. But if someone later edits that Miro card, you wouldn’t see any changes in Wrike.
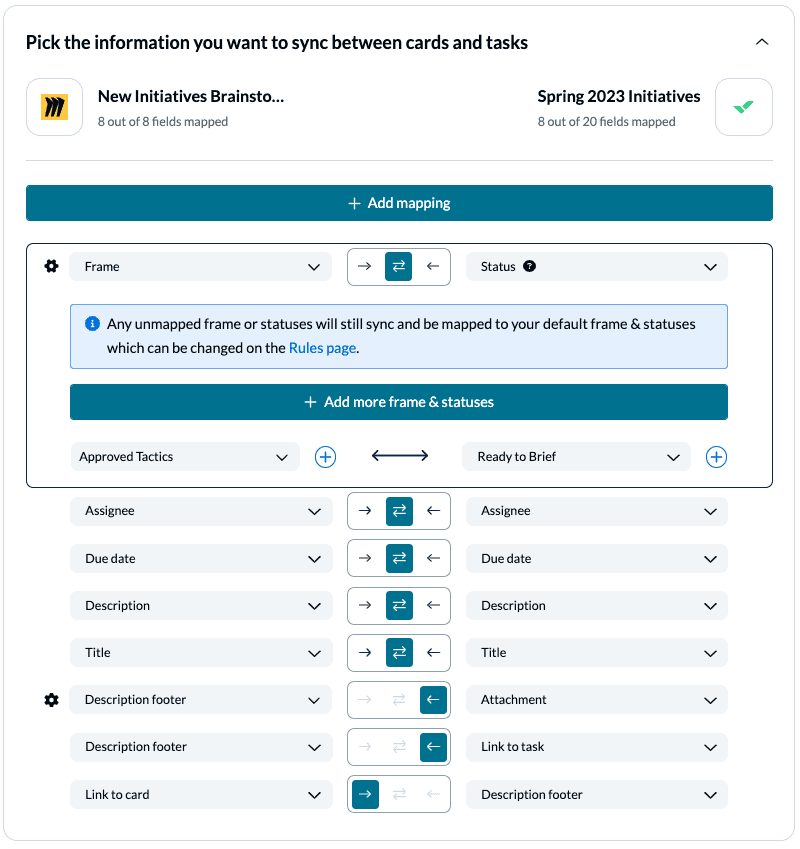
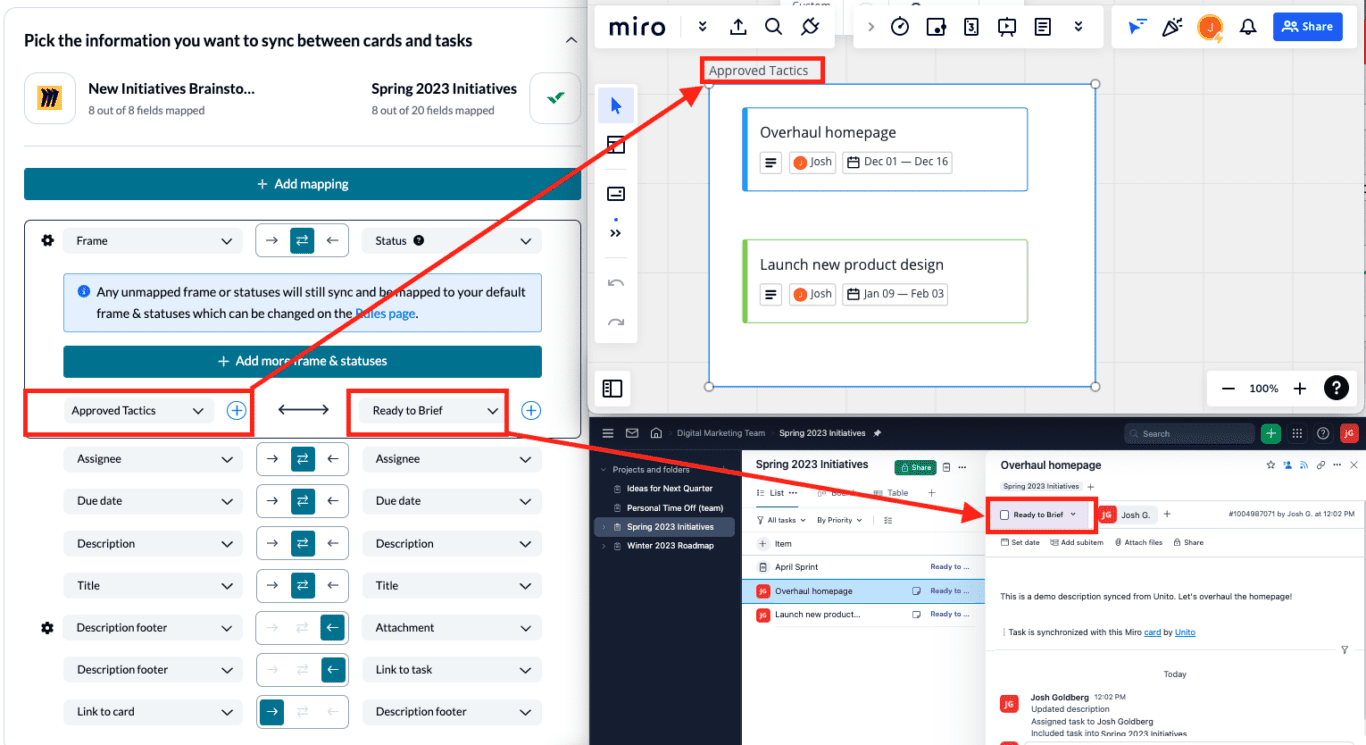
To map fields, simply select +Add mapping, then Select a field in each column to pair fields together between Miro and Wrike. Here’s another look at our field mappings between Miro and Wrike with some context:
Click Confirm when you’re satisfied with your field mappings.
Step 5: Save and launch your workflow
And that’s it! You’ve just connected Wrike and Miro with Unito to sync cards to tasks. Congratulations!
The last step now is to decide whether or not to sync historical cards and tasks. If you look at the Most recent activity window, you’ll see a button labelled Include older work items or tasks:
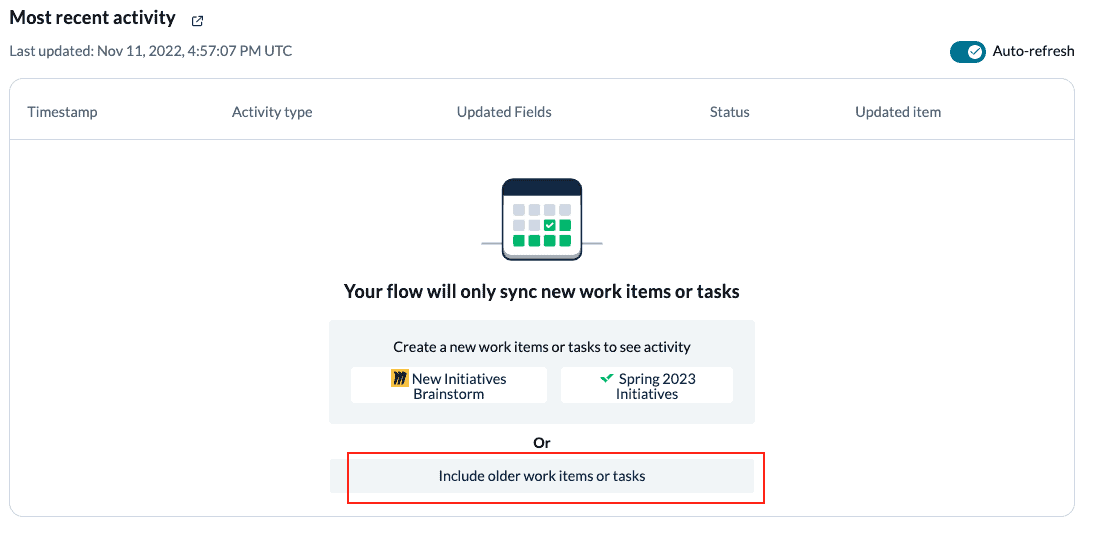
Selected this and following the on-screen instructions will enable you to sync previously created Miro cards. We include this functionality as a safeguard so you can test out each flow before launching to make sure it does what you expect it to do. If you’re happy with the steps above, go ahead and remove that restriction.
If you followed the steps above, your flow will now:
- Automatically create new Wrike tasks based on specific Miro cards
- Keep your Miro board and Wrike project updated in real-time automatically.
If you have any questions, please don’t hesitate to reach out and let us know.
What’s next after syncing Miro cards to Wrike tasks
- Duplicate this flow to sync additional Miro cards from your other boards to different Wrike projects.
- Power your reporting workflows by syncing Wrike tasks to Google Sheets or Microsoft Excel
- Connect Wrike with Jira or Trello to collaborate across project management tools
- Send Wrike task details to Airtable and back
- Learn more about Wrike Sync by Unito
- Collaborate on customer tickets in Zendesk from your Wrike interface.
- Set up a CRM integration by syncing Wrike tasks with Salesforce.
Why sync Miro cards with tasks in Wrike or another tool
Not everyone uses Miro for brainstorming, but those who do, do it a lot! Getting those ideas into another workspace, however, can be a handful. Instead of going through each card with painstaking manual precision, let an automation platform such as Unito do all the heavy lifting for you. In addition to brainstorming, syncing Miro with a project management tool, such as Wrike, is great for compiling any information from your Miro sessions and turning them into actionable tasks.
Above all, it saves time. Loads of it. With this integration, all of your data will remain in Miro with new tasks created by Unito in Wrike. If you then update details in a synced Miro card, you’ll see those same updates appear in your task automatically. Unito is great for customizing and personalizing individual use cases, so you can also add conditions and multiple actions through the rules section (described below).